Windows Malware Development Part 2: Payload Placement Basics - .text
Objective
Hey guys, welcome to the second part of Windows Malware Development, in which we will be beginning with the basics of payload placement. In this post, we will be looking at how to place our shellcode in the .text section.
.text Section
If you recall from the previous post, the .text section contains code that needs to be executed by the program. For example, any code that lies within the main function of your program goes in the .text section.
In this example, we will be looking at a basic program that:
- Stores shellcode in a memory buffer.
- Makes that buffer executable in nature.
- Executes the shellcode.
You will need Visual Studio/Visual studio build tools, x64dbg and ProcessHacker for this exercise.
Writing the program
Defining the Shellcode Array
We will first start off by defining a character array that initially holds our shellcode.
Instead of using the basic method of directly initializing a character array with our shellcode in main itself, we can use the directive #pragma section(".text") in order to specify the section, and then use __declspec in order to place our shellcode in .text:
#include <stdio.h>
#include <stdlib.h>
#include <string.h>
#include <windows.h>

#pragma section(".text")
__declspec(allocate(".text")) const unsigned char Text_RawData[] = {
    0x90,    // NOP
    0x90,    // NOP
    0xcc,    // INT3
    0xc3     // RET
};
The shellcode here in question is a series of assembly instruction that goes as follows:
0x90: No operation (NOP)0x90: No operation (NOP)0xcc: Break0xc3: Return (RET)
This is essentially a test shellcode, and its only function is to break the execution flow of our program. Why I’m using this particular shellcode is because we will be inspecting this program in the debugger later, and the 0xcc instruction will help us with that.
Allocating a Memory Buffer
Now, let’s allocate a memory buffer for storing our shellcode. We will be using the Windows API VirtualAlloc for this. Taking a look at documentation for VirtualAlloc, we can see that it takes 4 parameters:
LPVOID VirtualAlloc(
  [in, optional] LPVOID lpAddress,
  [in]           SIZE_T dwSize,
  [in]           DWORD  flAllocationType,
  [in]           DWORD  flProtect
);
[in, optional] lpAddress: An optional parameter that holds a pointer to the address of the memory allocation location.[in] dwSize: Size of the memory region in bytes.[in] flAllocationType: Specifies the type of memory allocation.[in] flProtect: Specifies the memory protection to be applied on the allocated pages of memory.
We will be using VirtualAlloc in the following manner:
int main() {
    printf("[i] Text_RawData function: 0x%p \n", Text_RawData);

    // Allocate executable memory.
    size_t codeSize = sizeof(Text_RawData);
    void* executableMemory = VirtualAlloc(NULL, codeSize, MEM_COMMIT | MEM_RESERVE, PAGE_READWRITE);

    if (executableMemory == NULL) {
        printf("VirtualAlloc Failed With Error : %d \n", GetLastError());
        return -1;
    }
As you can see, for the flAllocationType parameter, we have used the combined flag MEM_COMMIT | MEM_RESERVE. The operation is explained as follows:
MEM_COMMIT: Used for committing physical memory to the specified region.MEM_RESERVE: Used for reserving address space in the process’s virtual address space.
By using the combined flags, we have essentially both committed and reserved space for our shellcode in the process’s memory.
Making the Memory Region Executable
You can directly do this in
VirtualAllocitself, however, I will be doing this extra step for the purpose of practice and understanding theVirtualProtectAPI.
In order for us to be able to execute our shellcode, we will have to first move it into our newly allocated memory region, and make said region executable.
To move the shellcode, we will be using the memcpy function, copying our shellcode from the character array to the newly allocated memory region.
    // Copy the shellcode from Text_RawData to the executable memory.
    memcpy(executableMemory, Text_RawData, codeSize);
To make the memory region where our shellcode is stored executable, we will be using VirtualProtect. Taking a look at documentation for VirtualProtect, we can see that it takes 4 parameters:
BOOL VirtualProtect(
  [in]  LPVOID lpAddress,
  [in]  SIZE_T dwSize,
  [in]  DWORD  flNewProtect,
  [out] PDWORD lpflOldProtect
);
[in] DWORD flNewProtect: The memory protection to be set.[out] PDWORD lpflOldProtect: The old memory protection settings.
An
[out]parameter is a value returned by the function that is usually sent back to the caller for future processing or other operations that need to be done.You can think of it as an additional return value. In this case,
VirtualProtectstores the old memory protection settings in the variablelpflOldProtectof typePDWORD, in case the user wants to restore these settings.
We will be using VirtualProtect in the following manner:
// Change the memory protection to PAGE_EXECUTE_READ.
    DWORD oldProtect;
    if (!VirtualProtect(executableMemory, codeSize, PAGE_EXECUTE_READWRITE, &oldProtect)) {
        fprintf(stderr, "Failed to change memory protection.\n");
        return 1;
    }
As you can see, oldProtect is first initialized as a DWORD, as we know that this API will return a value of that type.
Executing the Shellcode
Now, lets execute the shellcode. To do this, we will be using something known as typecasting. We will be executing our shellcode as a function pointer.
Usually, you will see tutorials using the CreateThread or CreateRemoteThread APIs, however the reason that I am choosing this method to execute is to prevent the creation of a new thread, which for this particular case, is a good thing from a malware development perspective.
((void (*)())executableMemory)();
We are basically casting the pointer to our shellcode to a function pointer type ( done using void (*)()), and calling it as a function pointer. We will basically be jumping to our shellcode.
Memory Management
Finally, we will end the code by performing a memory management operation. It is a good practice in programming to free any memory that has been allocated and has served its purpose, in order to prevent memory leaks and under-performance. We will be using VirtualFree for this.
BOOL VirtualFree(
  [in] LPVOID lpAddress,
  [in] SIZE_T dwSize,
  [in] DWORD  dwFreeType
);
It takes three parameters, the first to being self-explanatory:
[in] DWORD dwFreeType: The type of memory deallocation to perform.
We will be using MEM_RELEASE as the free type, since this will ensure that both physical memory and virtual addresses are deallocated.
// Free the allocated memory.
    VirtualFree(executableMemory, 0, MEM_RELEASE);

    printf("[#] Press <Enter> To Quit ...");
    getchar();
    return 0;
}
So all in all, our final program looks like this. I have added in console output statements and breaks in order to break the program into different steps for us to analyze:
#include <stdio.h>
#include <stdlib.h>
#include <string.h>
#include <windows.h>

#pragma section(".text")
__declspec(allocate(".text")) const unsigned char Text_RawData[] = {
    0x90,    // NOP
    0x90,    // NOP
    0xcc,    // INT3
    0xc3     // RET
};

int main() {
    printf("[i] Text_RawData function: 0x%p \n", Text_RawData);

	// Allocate executable memory.
    size_t codeSize = sizeof(Text_RawData);
    printf("[1] Press <Enter> To Allocate Memory ...");
	getchar();
	void* executableMemory = VirtualAlloc(NULL, codeSize, MEM_COMMIT |  MEM_RESERVE, PAGE_READWRITE);

	if (executableMemory == NULL) {
        printf("VirtualAlloc Failed With Error : %d \n", GetLastError());
        return -1;
    }

	printf("[i] Memory allocated at : 0x%p \n", executableMemory);

	// Copy the shellcode from Text_RawData to the executable memory.
    printf("[2] Press <Enter> To Write Shellcode ...");
	getchar();
	memcpy(executableMemory, Text_RawData, codeSize);

	// Change the memory protection to PAGE_EXECUTE_READ.
    DWORD oldProtect;
    if (!VirtualProtect(executableMemory, codeSize, PAGE_EXECUTE_READWRITE, &oldProtect)) {
        printf("VirtualProtect Failed With Error : %d \n", GetLastError());
        return -1;
    }

	// Execute our shellcode
    printf("[#] Press <Enter> To Run ...");
	getchar();
	((void (*)())executableMemory)();
	return 0;

	// Free the allocated memory.
    VirtualFree(executableMemory, 0, MEM_RELEASE);

    printf("[#] Press <Enter> To Quit ...");
    getchar();
    return 0;
}
Analyzing in x64dbg
In order to get a better understanding of how this works on a machine level, lets have a look at our program in x64dbg.
If you are using VS build tools, you can use the below command:
cl.exe /nologo /Ox /MT /W0 /GS- /DNDEBUG /Tcfilename.cpp /link /OUT:output.exe /SUBSYSTEM:CONSOLE /MACHINE:x64
Now, run the program and attach the debugger to it. Since we have included console output of the addresses at every step, you can understand the allocation and execution process better.
Initially, you can see that our shellcode starts off in the .text section as intended. After that, the allocation and preparation stages take place.
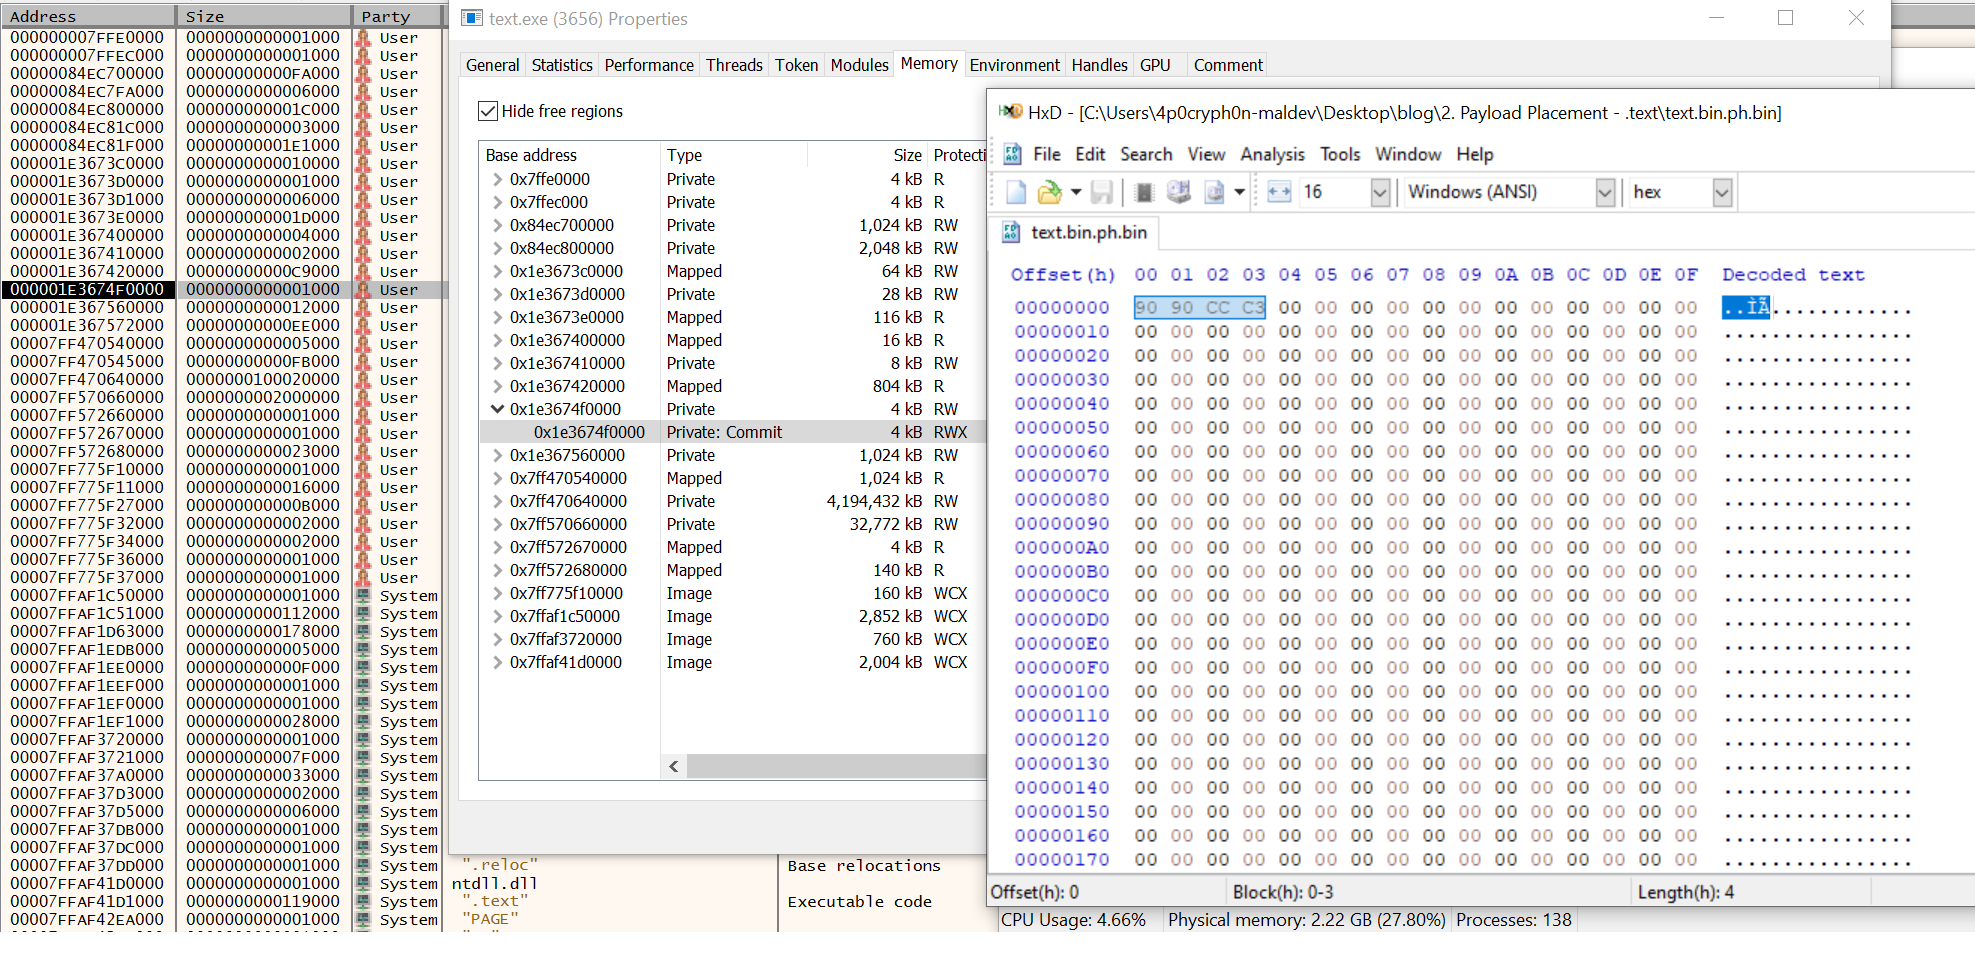
Right after the execution of VirtualProtect, you can see the protections of the memory region being changed in the memory map tab of the debugger. You can see that the initial permissions were RW (ReadWrite), and now the permissions are ERW (Execute-ReadWrite).

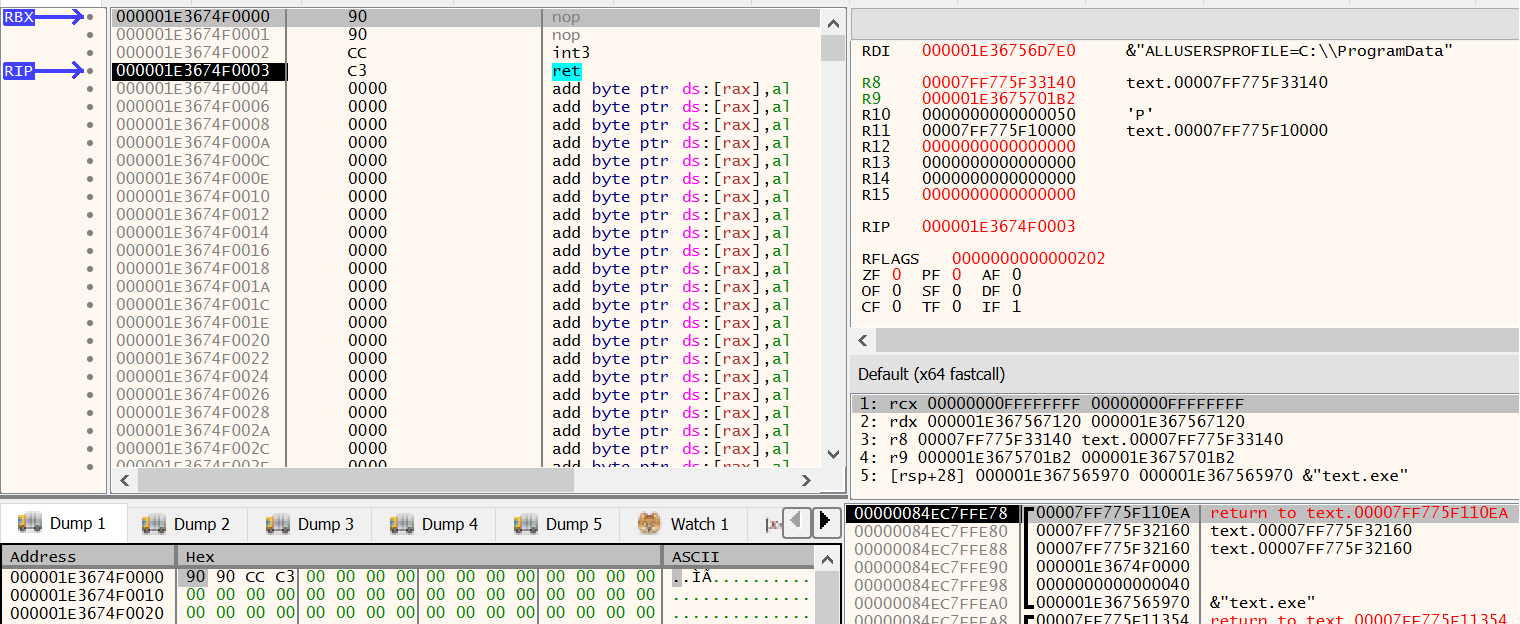
Switching back to the CPU tab, we can see that our shellcode is ready to be run. During execution, this is how it looks:

One more interesting thing that we can see is in Process Hacker, if you view the properties of our binary and go to the memory tab, you will clearly see an RWX memory region with our shellcode in it.

That’s all for this post! See you in the next, in which we will be further touching upon the basics of payload placement using other techniques.

